Getting a new roof is a major project, and the fastest way to keep your home protected is to plan the right steps before crews arrive. The most urgent questions are simple: what happens first, what should be ready at your property, and how do you avoid surprises that add time and cost?
Effective roof install prep work reduces risks like deck rot going unnoticed, material delays, or weather setbacks, and it ensures the crew can work safely and efficiently. Professional contractors bring measured planning, code knowledge, and safety controls so the job starts on time and finishes cleanly. A clear plan and a qualified team protect your investment from day one.
Experienced roofers verify structure, ventilation, and material fit so your new system performs for decades, not just the first storm. That diligence also limits change orders that can strain budgets and timelines. Hiring vetted professionals means accurate measurements, documented scope, and proper protection of landscaping, siding, and attic contents while work proceeds. When the right contractor is on the job, the schedule, costs, and site safety are predictable—and your home stays secure throughout the process.
What Happens Before a Roof Installation Begins
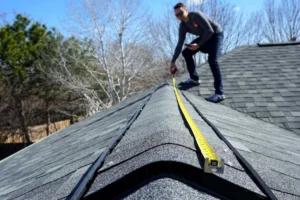
The process begins with a thorough roof assessment that documents current condition, measurements, and ventilation requirements. A reputable contractor checks decking integrity, flashing points, penetrations, skylights, and valleys to identify repairs that need to occur before any shingles or panels go on.
Clear photos and written notes make the scope transparent and help set expectations for timing and cost. If storm damage or leaks are present, the contractor will outline temporary protections and the sequence of permanent repairs. That early diligence is the foundation for a safe, efficient installation day.
Next comes material selection and ordering informed by climate, roof pitch, and local codes. Contractors explain options for shingles, metal, or membranes and specify underlayment, ice and water barriers, and ventilation upgrades as needed. Budget clarity improves when you understand how material affects lifespan and labor, and you can review the average cost of roof replacement by material to align choices with long-term value. Scheduling is then coordinated around lead times, dumpster placement, crew availability, and weather patterns to reduce downtime.
Professional teams finalize site logistics, including access routes, staging areas, safety lines, and daily cleanup plans. Communication covers start times, noise expectations, and how crews will protect landscaping, driveways, and attic spaces. Deposit terms, change-order rules, and warranty documentation are confirmed so there are no surprises.
Success here depends on clear scope and the right crew; using a vetted matching platform like American Home Quotes helps you compare licensed, insured roofers who follow documented procedures for roof install prep work. That combination of planning and accountability keeps your project on track.
Preparing Your Home and Property for Installation Day
Noise, foot traffic, and debris are unavoidable during roof work, but solid preparation makes the experience smoother and safer. Clear the driveway and garage so materials and dumpsters can be placed properly, and remove wall art or fragile items that might shift from vibration. Cover stored items in the attic and relocate vehicles away from the fall zone of old shingles. Share any concerns about gardens, ponds, or outdoor features so the crew can take extra precautions.
To make the first morning efficient, complete these quick homeowner tasks:
- Move vehicles, grills, and patio furniture away from the house.
- Mark sprinkler heads and delicate landscaping with flags.
- Secure pets indoors and arrange a quiet space for children.
- Close and lock windows, and pull drapes to reduce dust entry.
- Identify exterior power outlets for crew tools if requested.
- Note alarm sensors or cameras that may need temporary adjustments.
Professional crews will tarp shrubs, protect siding with plywood at high-risk edges, and use magnetic sweepers daily to capture nails. They also set up designated drop zones for tear-off debris and establish ladder and walkway safety to avoid property damage. Good contractors document the protection they provide and walk you through it before work begins. A platform that prescreens for insurance, licensing, and safety training, such as American Home Quotes, makes it easier to hire teams that follow these standards.
Confirm start times, anticipated tear-off duration, and the sequence for decking repairs in case hidden issues appear. If active leaks or storm openings exist ahead of your scheduled replacement, ask about stopgap measures and same-day service, and consider reviewing emergency roof repair options to protect interiors until full installation starts. Keep neighbors informed of the schedule to reduce parking conflicts and noise surprises. A short pre-job walk-through with the crew leader on installation morning aligns expectations and reduces mid-day interruptions.

Structural Repairs and Underlayment Preparation
Safe and lasting roof performance depends on what sits beneath the shingles or membrane. After the tear-off, professionals inspect the decking for rot, delamination, or improper spacing, replacing bad sheets and re-nailing to code. They check trusses and rafters for deflection, sistering members or installing supports where needed to restore load capacity. Critical details like drip edge, ice and water shield at eaves and valleys, and sealed underlayment transitions create a weather-tight base that resists wind-driven rain.
Ventilation is verified and upgraded if required to extend shingle life and prevent attic moisture buildup. Crews confirm balanced intake and exhaust, often adding soffit vents, baffles, or ridge vents to meet manufacturer specs. Flashing at chimneys, sidewalls, and skylights is replaced or rebuilt using corrosion-resistant metals and proper counterflashing techniques.
Each step is photographed and documented so you see exactly what was repaired and why it matters for performance and warranty compliance, and American Home Quotes helps you find contractors who deliver this documentation consistently.
Underlayment is installed according to slope, climate, and product requirements, with staggered seams, correct fasteners, and sealed penetrations. Valleys are lined with additional protection, and high-wind or cold-weather zones receive enhanced membranes at vulnerable points. Fastener patterns are verified, and transitions at ridges, hips, and edges are detailed to shed water cleanly. When these fundamentals are executed precisely, the final installation goes faster, looks better, and performs reliably under harsh conditions.
To understand the core components crews address before new roofing is laid, it helps to see them at a glance:
- Decking repair and re-nailing for structural integrity.
- Drip edge installation to protect the roof edges.
- Ice and water shield in eaves, valleys, and penetrations.
- Synthetic or felt underlayment with correct overlaps.
- New flashing assemblies at chimneys, walls, and skylights.
Permits, Inspections, and Final Pre-Install Checks
Permits ensure the work is legal and compliant with current building codes, and qualified contractors handle applications, fees, and required notices. Many municipalities require mid-project or final inspections, and reputable roofers welcome them because inspections validate safe construction and protect warranties. You should receive copies of permits, inspection approvals, and manufacturer registration details for your records. Ask who will meet the inspector, what will be checked, and how any corrections will be handled to avoid delays.
Before the first shingle is placed, teams perform a final pre-install checklist that confirms deck readiness, membrane coverage, flashing kits, and material counts. This step also verifies ladder securement, fall protection, and debris controls so the site is safe for workers and your family. A walkthrough with the crew leader is the best time to discuss change orders if hidden damage was found and to align on any budget adjustments.
For long-term maintenance planning and budget protection, it helps to understand why regular residential roof inspections are necessary and how they prevent small issues from becoming costly structural repairs.
Clear communication remains the most important pre-install task, and using a vetted matching platform like American Home Quotes streamlines it. The platform’s prescreened pros carry proper insurance, provide written scopes, and follow safety and permitting protocols that reduce homeowner risk. That level of transparency builds confidence when timelines are tight or the weather is changing quickly. When the checklist is complete, you can expect an organized site, a defined schedule, and a crew ready to install efficiently and safely.
Frequently Asked Questions About Roof Installation Preparation Checklist
Here are straight answers to common homeowner questions to help you plan with confidence:
-
How long does pre-installation planning typically take?
For most homes, planning and material ordering take one to two weeks, depending on supplier lead times. Complex roofs or special-order materials can extend that timeline.
-
What signs suggest hidden decking damage before tear-off?
Sagging areas, soft spots, interior stains, and musty attic odors often indicate moisture intrusion. A professional inspection and attic check help estimate potential repairs.
-
Do I need to be home on installation day?
It is helpful to be available for the morning walkthrough and end-of-day recap. Many homeowners step out during loud tear-off periods and return for key updates.
-
How do contractors protect landscaping and the driveway?
Crews use tarps, plywood shields, and designated drop zones to control debris. They also perform daily magnet sweeps to collect nails around the property.
-
What documents should I receive before work starts?
You should have a written scope, proof of insurance, permit confirmations, warranty terms, and a clear payment schedule. Photos from the initial inspection add valuable transparency.
-
How are weather delays handled during a roof replacement?
Responsible contractors monitor forecasts and stage only what they can dry-in the same day. If the weather shifts unexpectedly, they secure the roof with underlayment and tarps to keep interiors safe.
Key Takeaways on Roof Install Prep Work
Use these quick points to protect your budget, schedule, and home during a roof replacement:
- Thorough inspections and measurements upfront lead to an accurate scope, fewer change orders, and a smoother schedule.
- Homeowner preparation—clear driveways, protect attics, and secure pets—prevents delays and property damage.
- Quality underlayment, flashing, and ventilation upgrades before shingles go on determine long-term performance.
- Permits, inspections, and clear documentation safeguard warranties and ensure code compliance.
- Hiring licensed, insured roofers through a vetted platform reduces risk and increases project transparency.
- Contingency plans for weather and active leaks keep interiors safe until final installation is complete.
A successful roof replacement starts with planning, safety, and communication. Documented processes, the right materials, and a trustworthy crew prevent surprises and deliver durable results.
Need reliable help fast? Call 1-877-299-0515 or contact American Home Quotes to be connected with licensed, pre-screened roofing professionals in your area. The service is free to use, and you can compare multiple bids to get the right price and timeline. Save time, reduce risk, and move forward with confidence knowing every contractor in the network is vetted for credentials and customer care.
External Sources
- BrokerCalls: How Roofing Contractors Build a Reliable Lead Pipeline
- BrokerCalls: Can Roofing Contractors Get Leads Directly from Insurers?
- BrokerCalls: Roofing Leads